Eighty percent of swing faults trace back to one place: your hands. Not your hips, not your shoulder turn, not your foot position. Your hands. If you’ve been taking lessons, buying new equipment, or grinding on the range without seeing results, there’s a strong chance nobody ever taught you how to grip a golf club properly in the first place.
That one oversight cascades into a slice, a hook, fat shots, thin shots, and a handicap that refuses to budge. This guide fixes that. You’ll get the exact hand placement, grip style, and pressure levels that instructors charge good money to explain, broken down so you can act on it today.
Why How to Grip a Golf Club Actually Changes Everything
Your grip is the only point of contact between your body and the club. Everything your body does in the swing gets filtered through your hands before it reaches the face at impact. A misaligned grip rotates the clubface open or closed by two to four degrees before you even start your backswing, which at a 7-iron distance translates to roughly 15 to 20 feet of sideways error at the green. That’s not a swing problem. That’s a grip problem wearing a swing mask.
The good news is that the grip is the easiest fundamental to fix. You don’t need a lesson, a launch monitor, or a new club. You need about ten minutes of deliberate practice, and the rest of this article.
According to the PGA of America’s fundamentals resource, the grip is one of the five pre-swing fundamentals every golfer must understand before addressing any other technique issue. Instructors rank it first because it influences every other element of ball flight.
The Two Hands and Where They Actually Go
Left Hand Position on Golf Grip
Start with the lead hand. For a right-handed golfer, that’s the left hand. This is where most beginners go wrong immediately. They grab the club across the palm like they’re shaking hands with a shovel. That’s wrong.
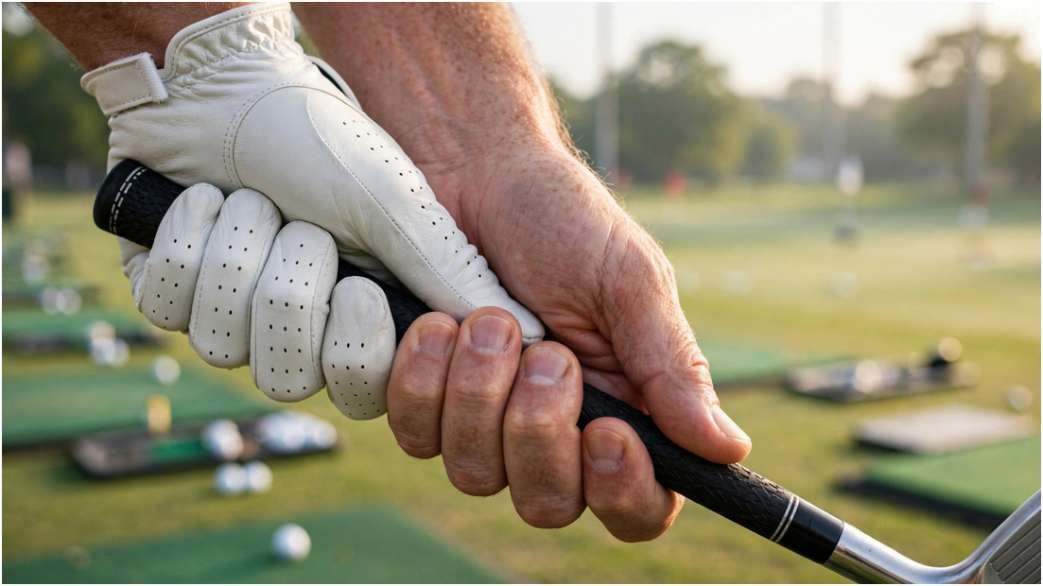
The correct left hand position on golf grip runs diagonally from the base of your index finger across to just above the heel pad of your hand. Lay the club across those two anchor points, close your fingers, and check that your thumb sits just to the right of center on the grip (slightly to the right side of the flat top of the grip). When you look down at your left hand, you should see two to two-and-a-half knuckles. That’s your checkpoint.
Why does this matter? A palm grip locks your wrist, kills your hinge, and costs you clubhead speed. A finger grip along that diagonal gives your wrist the freedom to hinge fully on the backswing and release through impact. That’s where distance comes from.
Right Hand Position on Golf Grip
The trail hand comes next. The right hand position on golf grip is primarily a finger grip. Your right index finger and middle finger wrap around the grip from underneath, and your right thumb sits slightly to the left of center on the flat top of the grip. The lifeline of your right palm should cover your left thumb, essentially swallowing it. That connection between the two hands is what makes them work as one unit.
When both hands are placed correctly, the “V” formed by the thumb and index finger of each hand should point roughly at your right shoulder. That’s your alignment check in practice.
Strong vs Weak Golf Grip: Picking Your Setup
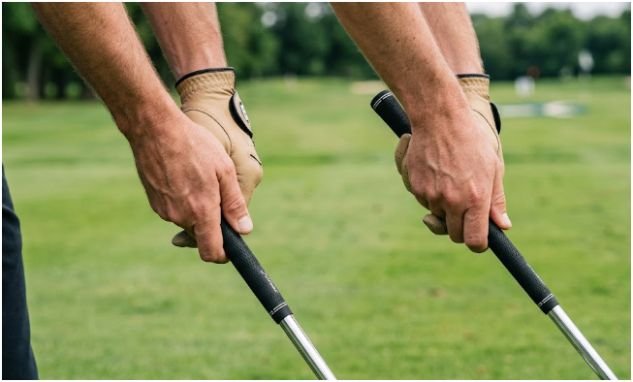
Once you understand hand placement, the next decision is grip style, and this one has a real impact on your shot shape. The strong vs weak golf grip conversation trips up a lot of golfers because the terms feel counterintuitive.
A strong grip means rotating both hands clockwise on the club (for a right-handed golfer), so you see three or more knuckles on the left hand. This closes the clubface through impact and promotes a draw. Many longer hitters naturally play with a strong grip. Dustin Johnson is one of the most extreme examples at the elite level.
A weak grip means rotating both hands counterclockwise, so you see only one knuckle on the left hand. This opens the face through impact and tends to produce a fade or a slice for amateur golfers. It’s not necessarily bad, but for most recreational players it makes controlling the ball harder.
A neutral golf grip position sits right in the middle: two to two-and-a-half knuckles visible on the left hand, the “V” shapes pointing at the right shoulder. The neutral golf grip position is where most teaching professionals start every student because it gives you the most consistent, reproducible ball flight to build on. Pick strong or weak later once you understand how the face is moving through your own swing.
| Grip Type | Knuckles Visible (Left Hand) | Typical Ball Flight | Best Suited For
|
|---|---|---|---|
| Weak Grip | 1 knuckle | Fade / Slice | Players who naturally over-rotate |
| Neutral Grip | 2 to 2.5 knuckles | Straight / Slight Draw | Beginners and most mid-handicappers |
| Strong Grip | 3 or more knuckles | Draw / Hook | Players seeking more distance or fixing a slice |
Interlock vs Overlap Golf Grip: Which One Should You Use?
After you sort out grip strength, you need to decide how your two hands connect. The interlock vs overlap golf grip debate has been going on since the 1920s, and both work at the highest levels of the game. Here’s the honest breakdown.
The overlap grip (also called the Vardon grip) is the most popular style among tour professionals and experienced amateurs. The pinky finger of the right hand sits on top of or between the index and middle fingers of the left hand. This keeps the hands unified and works best for players with larger hands and average-to-long fingers.
The interlock grip links the right pinky and the left index finger together, literally intertwining them. Jack Nicklaus and Tiger Woods both use the interlock. If you have smaller hands, shorter fingers, or you’ve noticed that your hands tend to separate under pressure, the interlock grip gives you a more secure connection. Many junior golfers and women golfers gravitate to it for this reason.
My honest take: start with the overlap. It gives you better feel for what each hand is doing independently, which helps you diagnose problems faster. If after a month it feels unstable or your hands consistently slip apart through impact, switch to the interlock and never look back. The goal is unity between the hands, not a style badge.
A small percentage of golfers use the baseball or ten-finger grip, where all fingers wrap around the club with no linking. It’s completely valid for beginners and players with arthritis, and several club professionals recommend it as a solid proper golf grip for beginners starting point before transitioning later.
How Tight Should Golf Grip Be? (Most Golfers Get This Completely Backwards)
Here’s the one that costs the most shots and gets the least attention. How tight should golf grip be? The standard answer you’ll hear from instructors is “imagine holding a tube of toothpaste without squeezing any out.” That’s a decent start, but it undersells the nuance.
The scale most coaches use runs from 1 (barely touching the club) to 10 (strangling it). Your target is a 4 to 5 for most shots. That’s firm enough to maintain control through impact, but relaxed enough that your forearms aren’t tense, your wrists can hinge freely, and your hands can release naturally through the ball.
Most recreational golfers grip at a 7 or 8, especially under pressure on a tight tee shot. That tension travels up the forearms, locks the shoulders, and kills sequencing. The result is a pull or a block because the body over-compensates for the restricted release.
“Grip pressure is the most underrated fundamental in golf. The moment a student learns to grip lighter, their swing speed goes up and their mishit rate drops. It’s counterintuitive, but looser really is longer.”
– Hank Haney, instructor to Tiger Woods for six years, from his instructional content published via Golf Digest.
One concrete drill for grip pressure: make three practice swings with the lightest grip you can manage without the club flying out of your hands. Then add just enough pressure to feel in control. That’s your 4 to 5. Commit that feeling to muscle memory before you hit balls.
Proper Golf Grip for Beginners: A Step-by-Step Setup Routine
If you’re new to the game and looking for a repeatable routine, this is the section for you. Learning proper golf grip for beginners means building a checklist you run through every single time you pick up a club, at least until the placement becomes automatic. Here’s the sequence that works.
- Hold the club in front of you at waist height, face pointing at the target, shaft parallel to the ground. This starting position removes the ground as a variable and lets you see exactly what your hands are doing.
- Place your lead hand first. Run the grip diagonally across the fingers of your left hand, from the base of the index finger to just above the heel pad. Close your fingers. Check that you see two to two-and-a-half knuckles. This locks in your left hand position on golf grip.
- Set your left thumb. Place it slightly right of center on the top of the grip. Not straight up, not wrapped around. Slightly right of center.
- Bring your right hand in. The lifeline of your right palm covers the left thumb. Your right fingers grip the club in the fingers, not the palm. This sets the correct right hand position on golf grip.
- Choose your connection style. Overlap or interlock. Whichever you picked earlier, apply it consistently.
- Check your V’s. Both V shapes formed by thumb and index finger on each hand point toward your right shoulder. That’s your neutral checkpoint.
- Set your pressure at a 4 to 5. Shake tension out of your forearms if needed. Your grip should feel secure, not clenched.
- Step into your address position. Lower the club to the ball. Do not re-grip once you’re over the ball. If it doesn’t feel right, step back and restart.
Run through this every rep for the first few weeks. Golfers who build this routine from the start rarely need a grip overhaul later. Those who skip it spend years unlearning bad habits.
Golf Grip Hand Placement: Common Mistakes and How to Spot Them
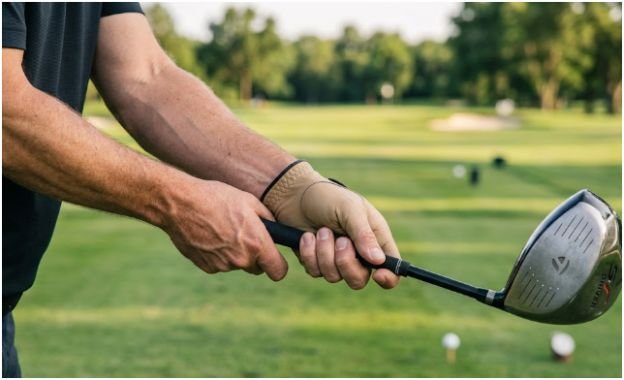
Even when golfers know the theory, certain errors keep creeping back in. Golf grip hand placement errors are sneaky because they feel normal once you’ve been doing them for a while. Here are the four most common ones and how to self-diagnose.
The palm grip on the left hand.
You’ll know this is happening if your wrists feel locked at the top of your backswing and you’re consistently hitting the ball low and left. The fix is the diagonal placement described above. It takes about a week to start feeling natural.
Separating hands.
If there’s a gap between your two hands at any point during the swing, they’re not working as a unit. This usually means you skipped the overlap or interlock connection, or your pressure is so low that the hands drift independently. Reconnect the hands and add just a touch more pressure with the last three fingers of the left hand.
The right thumb on top.
Many beginners wrap the right thumb straight over the top of the grip. That creates a “trigger” pressure point that encourages casting (throwing the club from the top). Move that thumb to slightly left of center, applying gentle downward pressure, not a death wrap.
Re-gripping at address.
This happens when golfers take their grip, address the ball, waggle a few times, and then subtly shift their hands before starting the swing. Every shift changes your face angle. Take your grip once, check it, commit to it.
Golf Grip Pressure Tips for Playing Under Stress
The range is easy. Hit a bad shot, pick up another ball, move on. On the course, the tension is different. A narrow par-4 with out-of-bounds right, a 180-yard carry over water, a three-footer to save your best-ever score: all of these raise your grip pressure by at least two notches without you noticing. These golf grip pressure tips keep your hands from sabotaging your execution when it counts.
First, use a physical trigger. Before every shot, squeeze the grip firmly for two full seconds, then consciously release to your 4 to 5 level. The deliberate squeeze-and-release breaks the tension cycle and gives you a reliable reset point. Tour caddies talk about this with their players constantly.
Second, monitor your forearms, not your hands. Grip pressure actually shows up in forearm tension before you feel it in your fingers. If your forearms feel tight during your pre-shot routine, your grip is already too firm. Shake out your hands, re-grip, and check again.
Third, breathe out before you start your takeaway. A full exhale physically relaxes your upper body and drops your grip pressure by a measurable degree. It sounds almost too simple, but the physiological connection between controlled breathing and muscle tension reduction is well documented in sport science research. Apply it deliberately.
How to Hold a Golf Club Correctly with Different Clubs
The fundamentals of how to hold a golf club correctly stay consistent across every club in your bag. Your hand placement, your pressure, your V alignment, none of that changes whether you’re hitting a 60-degree wedge or a driver. What does change is subtle. if you are beginner, know about the best irons for beginners to know right placement and pressure along with your alignment with it.
With short irons and wedges, grip down slightly on the handle, about half an inch to one inch from the butt end. This gives you more control and feel, which is exactly what you want inside 100 yards. Your pressure can be slightly firmer, around a 5 to 6, because you’re trading speed for precision.
With the driver, grip the full length of the handle, right at the top. Let your grip pressure sit at the lighter end, a 3 to 4, because you want maximum wrist hinge and release for clubhead speed. A death grip on the driver is the single fastest way to lose 15 to 20 yards off the tee.
Putters are their own world. Many golfers use a completely different grip style for putting, including the claw grip, the cross-handed grip, or a palm-to-palm style. That’s appropriate because putting is a precision stroke, not an athletic motion. The same grip pressure principles apply, but don’t feel obligated to use your full-swing grip style on the green.
How to Grip a Golf Club: Building the Habit That Sticks
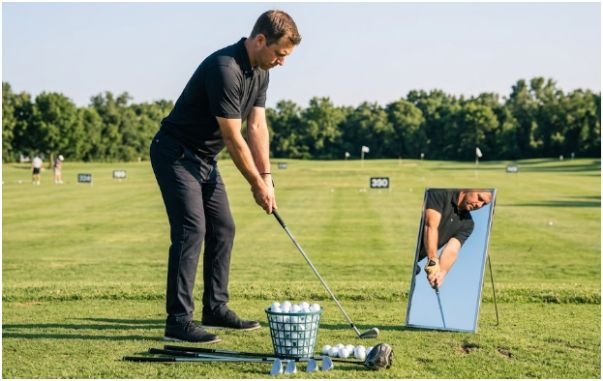
Knowing the right grip and actually ingraining it are two different challenges. Your old grip has years of neuromuscular memory behind it. The new one will feel wrong for a while. That’s not a sign you’re doing it incorrectly. That’s a sign it’s different from what your hands expect.
Research published in the Research Quarterly for Exercise and Sport suggests that motor skill acquisition in sports requires between 300 and 500 quality repetitions before a new movement pattern starts to feel automatic. For grip work, that means checking your grip on 300 to 500 practice swings or range balls before you judge the results.
Here’s a practical four-week plan to build the habit.
- Week 1: Take your correct grip 20 times per day at home, standing in front of a mirror, without swinging. Just set the grip, check the checkpoints, release, repeat.
- Week 2: Hit 50 range balls with deliberate grip checks before every single shot. Slow down your pre-shot routine. Speed kills habit formation.
- Week 3: Play a casual round with one goal only: nail the grip setup on every shot before you worry about anything else. Track misses by type (left, right, fat, thin) to see if your patterns shift.
- Week 4: Start building the rest of your pre-shot routine around the grip check. The grip becomes your anchor, not an afterthought.
Also, check your physical grips (the rubber or cord material on the club itself) regularly. Worn grips force you to squeeze harder to maintain control, which inflates your pressure above your target zone without you realizing it. The USGA recommends re-gripping at least once per season for active golfers, and twice if you play more than 30 rounds per year. Fresh grips cost about $10 to $15 per club installed, and the feel difference is immediate.
Grip Pressure Tips Cheat Sheet
| Situation | Recommended Pressure (1 to 10 scale) | Why
|
|---|---|---|
| Driver / Woods | 3 to 4 | Maximum release for speed |
| Long Irons (3 to 5) | 4 to 5 | Balance of control and speed |
| Mid Irons (6 to 8) | 4 to 5 | Standard shot |
| Short Irons / Wedges | 5 to 6 | Precision over speed |
| Tight / Pressure Shots | 4 to 5 (squeeze-release method) | Consciously counter tension buildup |
How to Hold a Golf Club Correctly: Your Final Self-Check
Before you head to the range with your new grip, run through this final self-check. These five questions cover everything. If you can answer yes to all of them, your grip is ready.
- Do you see two to two-and-a-half knuckles on your left hand when you look down at address?
- Does the lifeline of your right palm sit directly over your left thumb with no gap between the hands?
- Are both V’s formed by your thumbs and index fingers pointing toward your right shoulder?
- Can you squeeze your forearms gently and feel that they’re relaxed, not braced?
- Are you using a consistent connection method (overlap or interlock) every single time?
Five yeses. That’s the grip. Everything else in your swing now has a foundation worth building on. While playing, nervousness comes on its own, and your palms become sweaty. In that case you must choose the right golf gloves for sweaty palms and improve your grip on golf club.
The Bottom Line
Mastering how to grip a golf club is genuinely the highest-return investment you can make in your game. It costs nothing, requires zero equipment, and can be practiced in your living room at 10 PM. The players who skip this step spend years patching a swing built on a flawed foundation. The ones who nail it early find that lessons, range sessions, and on-course adjustments all start clicking faster, because the hands are finally doing their job correctly.
Pick your grip style, set your hand placement with the checkpoints above, train your pressure down to that 4 to 5 zone, and give it 300 quality reps before you judge the outcome. Your ball flight will tell you the truth faster than any instructor’s eye can. So here’s the real question: how many rounds are you willing to lose before you take ten minutes to check your grip?